Create new table(s) to match the controls on your UX component
Description
Creates tables for existing controls in the UX Component. The new tables and fields will match the controls in the UX. Use this command if you have designed a UX component and would now like to create table(s) that match the structure of your UX. Once you have created table(s) to match the structure of your UX, you will be able to add code int he 'afterDialogValidate' event to save the data that the user submits to one or more tables.
Discussion
Make Table(s) for UX Component Controls Builder
This table builder consists of an overview tab followed by three tabs that help you to construct the table.
Overview
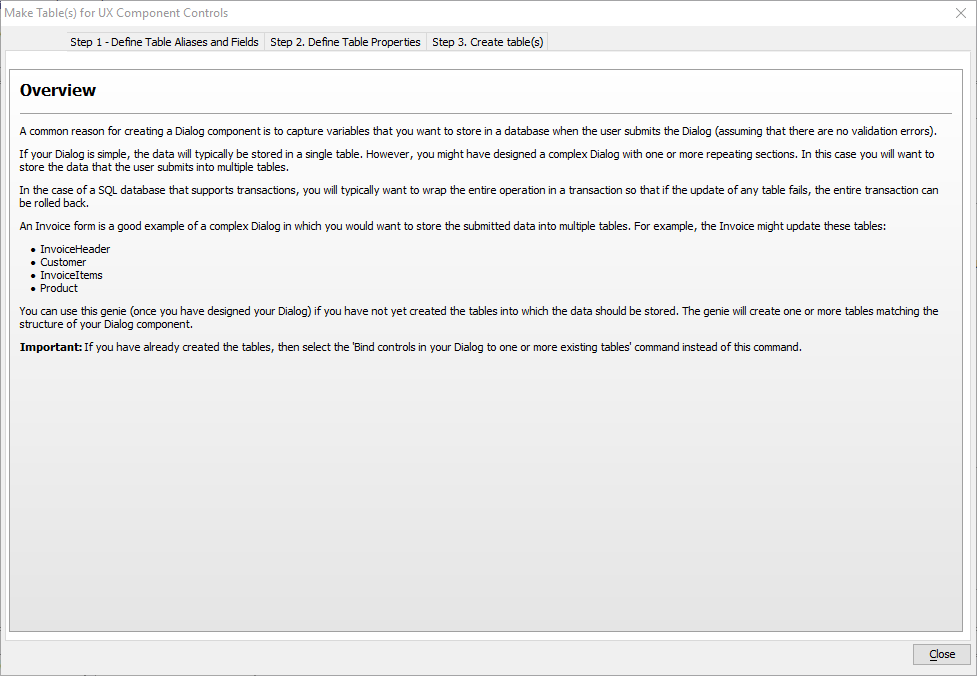
A common reason for creating a Dialog component is to capture variables that you want to store in a database when the user submits the Dialog (assuming that there are no validation errors).
If your Dialog is simple, the data will typically be stored in a single table. However, you might have designed a complex Dialog with one or more repeating sections. In this case you will want to store the data that the user submits into multiple tables.
In the case of a SQL database that supports transactions, you will typically want to wrap the entire operation in a transaction so that if the update of any table fails, the entire transaction can be rolled back.
An Invoice form is a good example of a complex Dialog in which you would want to store the submitted data into multiple tables. For example, the Invoice might update these tables:
- InvoiceHeader
- Customer
- InvoiceItems
- Product
You can use this genie (once you have designed your Dialog) if you have not yet created the tables into which the data should be stored. The genie will create one or more tables matching the structure of your Dialog component.
If you have already created the tables, then select the 'Bind controls in your Dialog to one or more existing tables' command instead of this command.
Step 1. Define Table Aliases and Fields
This screen shows you the number of 'Logical Sections' in your UX component. If your UX component does not have any 'Repeating Sections' then your UX component only has a single 'Logical Section' (called the <Top Level> section). If you have one or more 'Repeating Sections' in your UX component, then your UX has multiple 'Logical Sections'.
Specify the Table Aliases Used in the UX component
For each 'Logical Section' in your UX, you specify the table aliases that the controls in that section will map to. In many cases each 'Logical Section' in your UX component will map to a single table alias. However, consider the case of an Invoice form. Some of the controls in the <Top Level> section will map to the 'InvoiceHeader' table and some will map to the 'Customer' table.
Bind Controls to Table Aliases and Specify Field Definitions for each Field
Once you have defined the table aliases for each UX component 'Logical Section', you will map the UX component controls in each 'Logical Section' to the appropriate table alias and specify the definition of the field (e.g. field name, size, decimal places) that you want to map the UX component control to.
Step 2. Define Table Properties
This is where you define the mapping of the tables to your database. Tables can be mapped to existing tables in a database or to new tables. Select or create a connection string to the database where you want to create the tables and configure the table mapping to your database.
Step 3. Create Table(s)
The last step in the Create tables for existing controls process is to create the tables and update the data binding for the controls in your UX Component. During the Create Table(s) step, you can choose to create the tables or save settings. The latter will save the settings defined in the Genie without creating the tables or updating the data binding settings for the UX controls. This allows you to save your settings and finish configuring tables and data binding later. To see a list of actions that Alpha Anywhere will perform when the Create Table(s) button is clicked, click the Show summary of work to do link in the upper left-hand corner.
Examples
Create a Table with a Single Alias
Creating new SQL or DBF tables from the Data Binding page is a relatively straightforward process, as demonstrated by the example below. You can also watch these three videos for an explanation: Part 1, Part 2, Part 3.
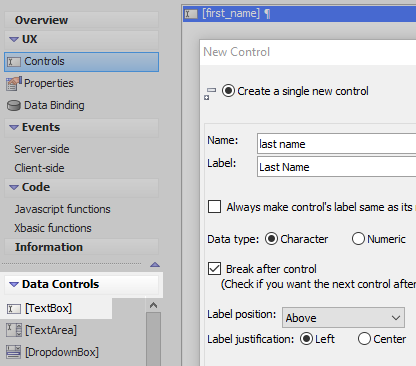
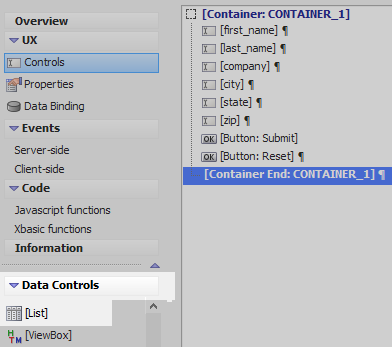
In the UX Builder on the UX Controls page open the 'Data Controls' menu. Select the [TextBox] option to add a textbox to the component. Give this text box the name and label 'first name'.

Click the [TextBox] option a second time to add another textbox control. Name and label this control 'last name'
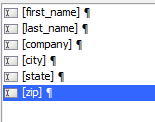
Add four more [TextBox] controls to the component with the following names, 'company', 'city', 'state', and 'zip'. Set the labels to match the names.
Highlight the last textbox in the controls tree. Open the 'Defined Controls' menu and click the 'Submit-Reset' option. A Submit and Reset button should both be added to the component.
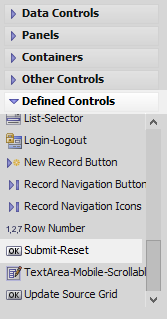
Highlight all of the controls in the controls tree. Open the Containers menu and click on the [Frame] option and click OK.

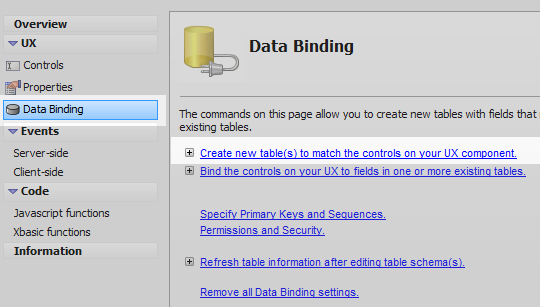
Open the 'Data Binding' page and click on the 'Create new table(s) to match the controls on your UX component' option.
Open the 'Step 1 - Define Table Aliases and Fields' pane. Click the Add button in the Table aliases area to add a new table alias. Give the new table alias a name like 'returning'
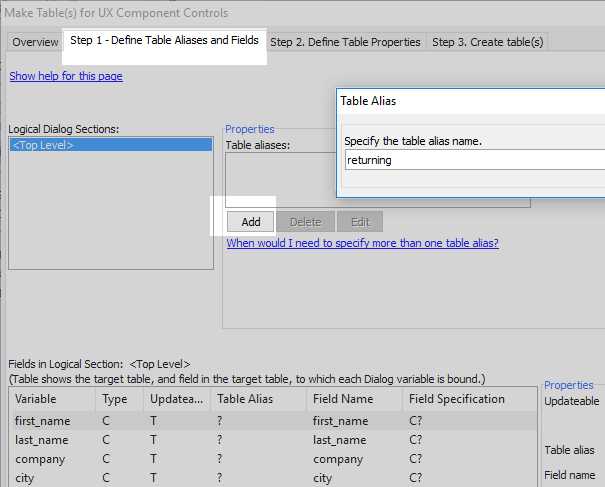
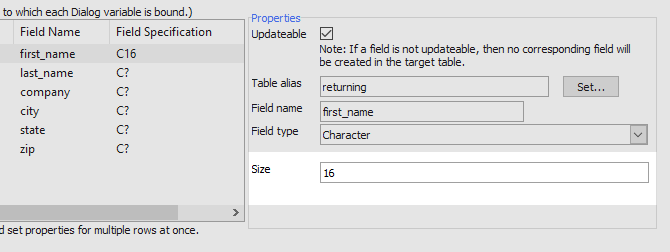
You should see all of the textbox controls that you created appear as individual fields in the table at the bottom of the Step 1 pane. Highlight the 'first_name' variable.
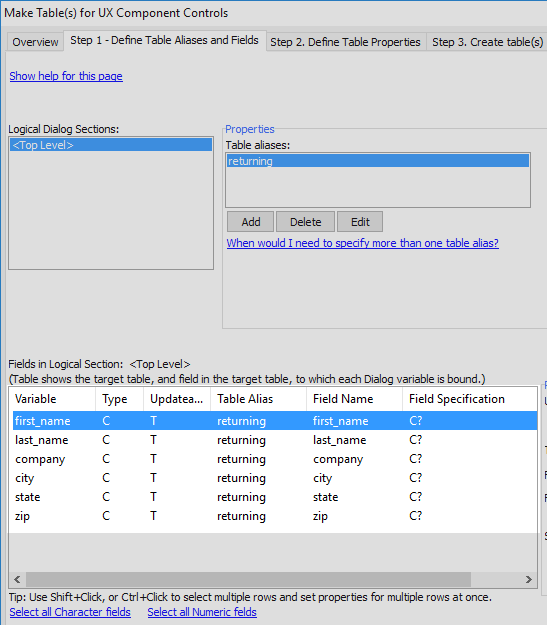
In the field 'Properties' editor in the lower right set the 'Size' of the firstname field to be '16'. This will be the maximum number of characters that any given name in the field can be.
Highlight the 'last_name' variable and set this field's 'Size' property to be '16' as well.
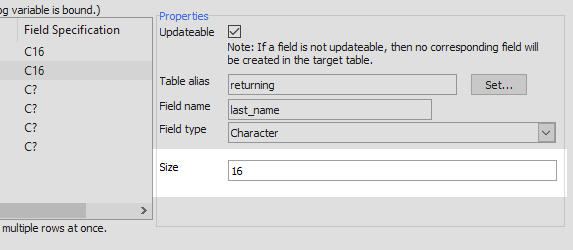
Assign sizes to all of the remaining variables.
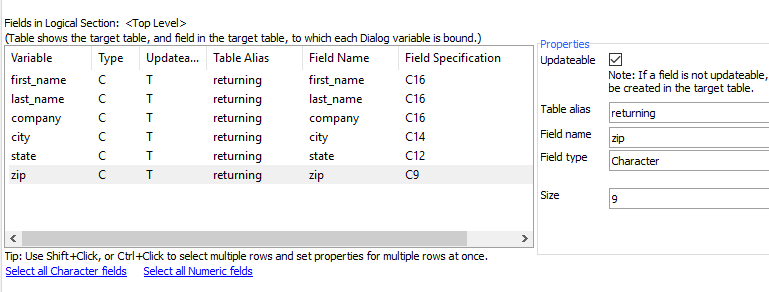 You can also set the Field type for different fields in the properties editor.
Open the 'Step 2. Define Table Properties' pane. Highlight the 'returning' Table Alias.
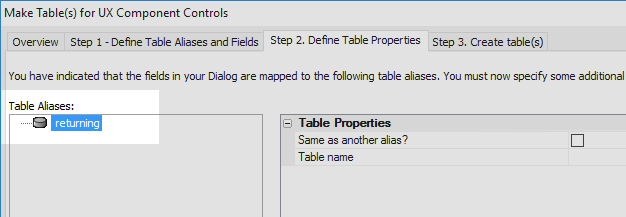
In the Table Properties list on the right set the 'Table name' property to be something like 'Returning_Customers'

At the bottom of the 'Step 2' pane in the 'Global Table Properties' section click the dropdown next to the 'Table type' property and select 'SQL'.
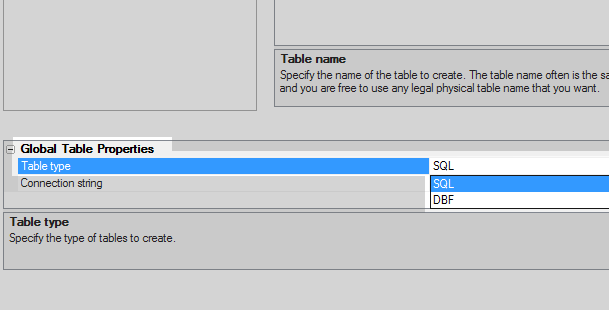
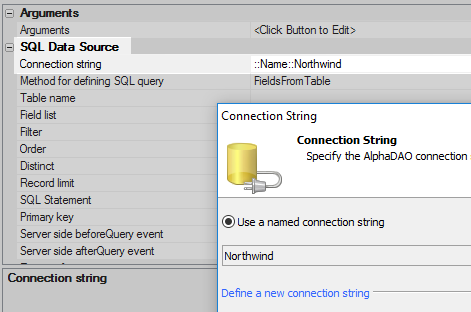
Click the [...] button next to the 'Connection string' property

In the Connection String dialog connect to the Northwind database that is included with Alpha Anywhere.

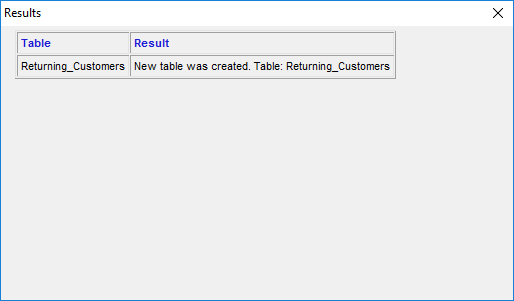
Open the 'Step 3. Create table(s)' pane and click the 'Create table(s)' button.

You should get a result message.
Open the UX Controls menu again. Open the 'Data Controls' menu and click on the [List] option to add a list control to the end of the component controls tree. We will use this list to view the new table and data as it is entered.
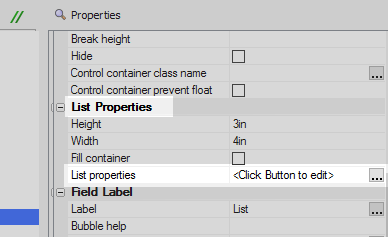
Highlight the list control in the controls tree. In the properties list on the right click on the [...] button next to the 'List properties' property in the 'List Properties' section. The List Builder will open.
On the List Builder's Data Source pane set the 'Data Source Type' to be 'SQL'
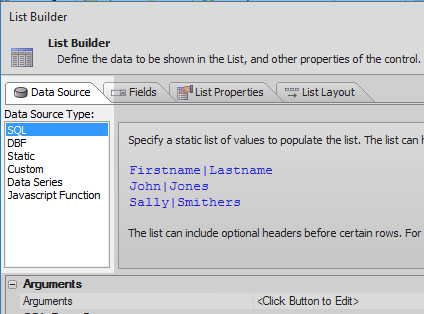
In the Data Source pane's properties list click the [...] button next to the 'Connection string' property and again select the Northwind database.
Click the [...] button next to the 'Table name' property. Select the new 'Returning_Customers' table that you defined. This should be listed along with the other tables that come with the database..

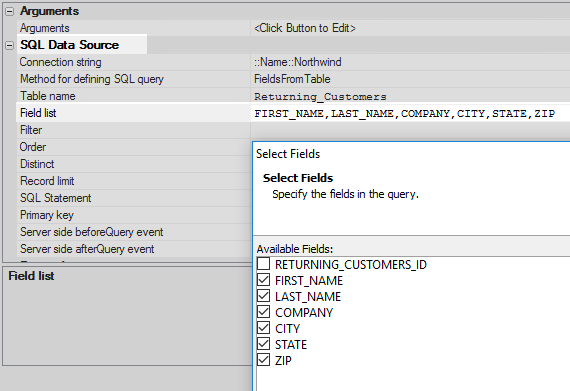
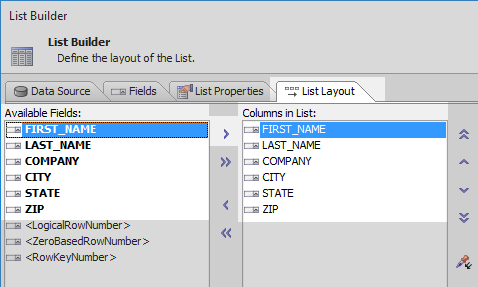
Click the [...] button next to the 'Field list' property. Select the FIRST_NAME, LAST_NAME, COMPANY, CITY, STATE, and ZIP fields and click OK.
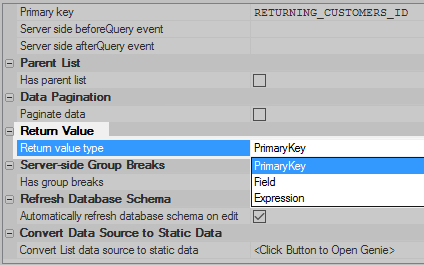
Scroll down to the 'Return Value' section of the Data Source properties list. Set the 'Return value type' property to 'PrimaryKey'.
Open the 'List Layout' pane in the list builder. Use the blue '>' arrow to move the FIRST_NAME, LAST_NAME, COMPANY, CITY, STATE, and ZIP fields from the 'Available Fields' list to the 'Columns in List:'. Click OK to close the list builder.
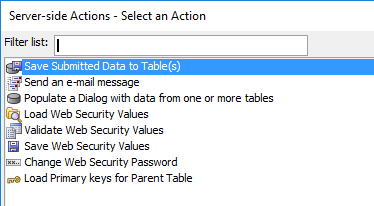
In the main menu open the 'Server-side' page in the Events section and select the 'afterDialogValidate' event.

Place the cursor inside the event's function definition and then click on the 'Action Scripting' button.

Select the 'Save Submitted Data to Table(s) action and click OK.
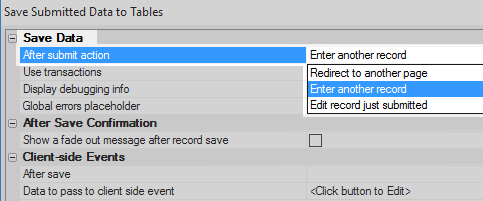
In the 'Save Submitted Data to Tables' dialog's properties list click the dropdown next to the 'After submit action' property in the 'Save Data' section. Select the 'Enter another record' option.
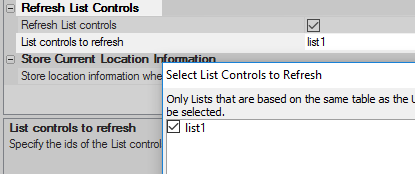
Scroll down the 'Refresh List Controls' section and check the 'Refresh List controls' property.
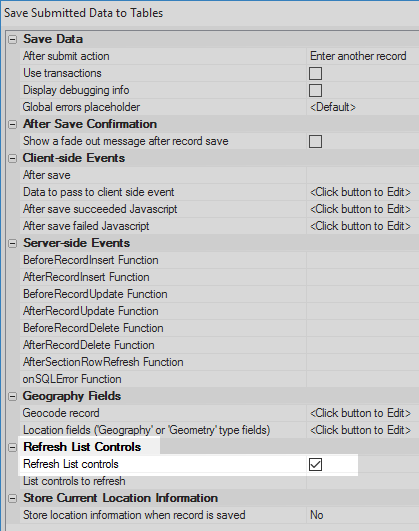
Click the [...] button next to the 'List controls to refresh' property. Select the list you defined, 'list1' in this case, and click OK.
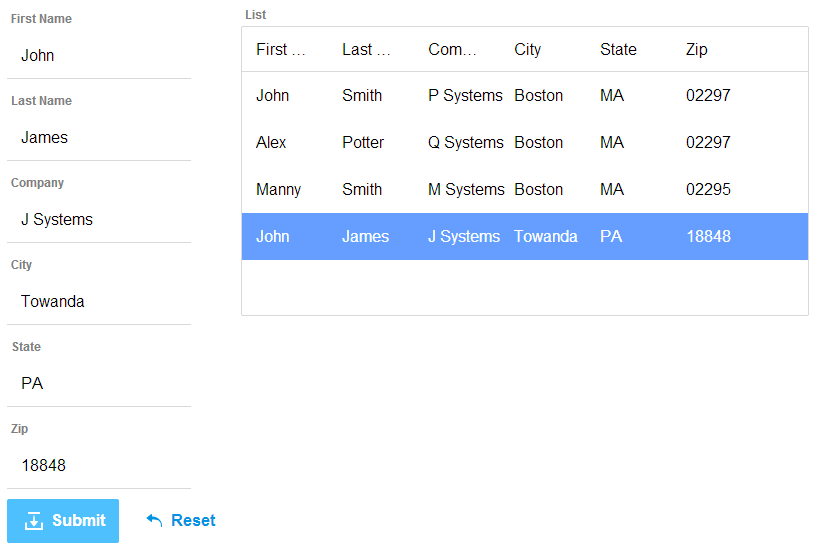
Run the component in Live Preview. Type data into each of the fields and then click the 'Submit' button. You should see the data appear in the list control.